Editor Update 5/12/21 — Windows Live Photo Gallery is no longer supported.
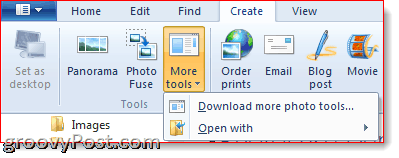
Found on the Create section on the Live Photo Gallery 2011 ribbon is two groovy features: Panorama and Photo Fuse. But it also serves as a gateway to a plethora of plug-ins and photo tools that really take Windows Live Photo Gallery 2011 beyond a basic picture and video organization program. Let’s take a look at all of the goodies on the Create Ribbon.
Much of what you find here is either self-explanatory or simply serves as a shortcut to other applications or web services. For example, the first button you’ll find in the top-left hand corner simply sets the selected picture as your desktop background. That’s handy, especially if you’re too lazy to Right-click your desktop and choose Personalize. If you’re wondering if you can set a video as a desktop wallpaper, the answer is: no. At least not with Windows Live Photo Gallery 2011 (try VLC’s DirectX Wallpaper mode for that). The next section includes the Tools, which are the star of the show here, so let’s save them for last. You also have the less interesting Share buttons that simply shoot your photo or video over to other programs in Windows Live Essentials. For example, clicking Email will open up Windows Live Mail (or whatever your default email client is) with a new message ready to go and the picture or video attached. Ditto for Blog Post, except it opens up a new blog post in Windows Live Writer with the image or video already embedded. Likewise, the Movie button exports the selected pictures or videos to Windows Live Movie Maker. Nothing but conveniences, really. The Order Prints button is pretty nice, actually, and it’s something you might want to show your less computer-savvy friends and relatives. A couple digital photo printers have colluded with Microsoft to allow you to upload photos and order prints, all from within Windows Live Photo Gallery. Currently, you can choose from CVS, Fujifilm. HP’s Snapfish, Kodak and Shutterfly, but as more services join the party, they’ll automatically pop up in the “Select a printing company” window.
This really takes the hassle and learning curve out of dealing with a new website’s upload protocol. Now, you can get from camera to computer to prints from a single application with just a few clicks.
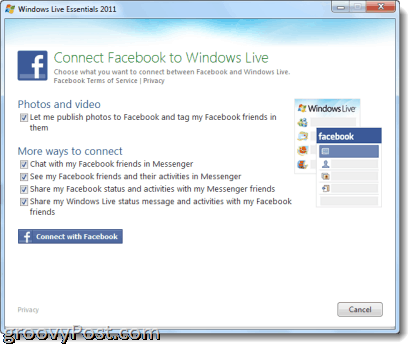
The Publish section includes a few web services that can connect to your Windows Live account for instant sharing. Upon clicking one, you’ll be asked to log in to our Windows Live account and then authorize it to connect. Once you do, you can upload videos to YouTube, post pictures and videos to your Facebook wall and add photos or videos to your Flickr, Windows Live Groups or Skydrive account with the click of a button.
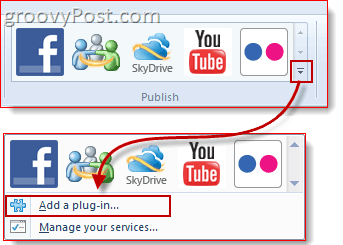
You can also add additional services and plug-ins by clicking the arrow in the Publish gallery and choosing Add a plug-in.
Windows Live Photo Gallery 2011 Panorama
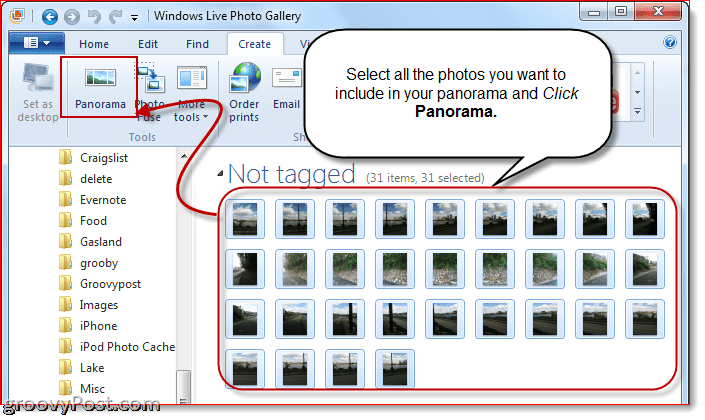
Okay, now I really want to show you the Panorama feature because I think it’s really groovy. Basically, it lets you take a series of photos and stitch them together into one continuous panoramic shot. No fancy panoramic camera or lens required. Awhile back, MrGroove showed you all How to Make a Panorama with Adobe Bridge and Adobe Photoshop, but for those of you who haven’t made the investment in pro photo editing software, Windows Live Photo Gallery 2011 lets you do it, too. Here’s how:
- Take a few photos (the more the better) that overlap slightly and import them into Windows Live Photo Gallery 2011. For best results, set your camera to manual and use a tripod. That way you won’t have a lot of variation in vertical vantage point and focus.
- Select all the photos you’d like to include in your panorama. Check the box in the top-left corner for each one, or simply click the first photo in a series, hold Shift and then click the last photo in the series.
- Click Panorama. Windows Live Photo Gallery will start going to town—it’ll analyze the photos, match them up, align them and stitch them all together.
- Save the Panorama photo with a new filename. Your source photos will still be intact. That’s all there is to it. As you’ll see, there will be a certain amount of black space above and below your photo, giving it a kind of jagged appearance. But you can just crop that out for a nice, print-worthy panorama. Here are few examples I did with my iPhone (for some reason, I like to do a 360 degree panorama–I know it defies reality, but I think its fun) :
Here’s one where I cropped out most of the black stuff. As you’ll notice, there’s a bit of a fish eye effect going on. That’s because I stood in one spot and rotated as I shot. For best results, you should actually move your entire body without rotating. But I was too embarrassed to sidestep all the way from the Duquesne Incline to Station Square along the Monongahela River with my iPhone out.
Photo Fuse with Windows Live Photo Gallery 2011
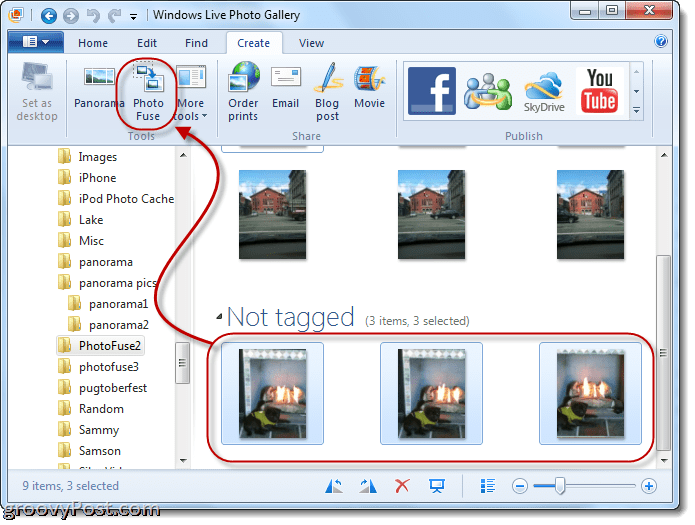
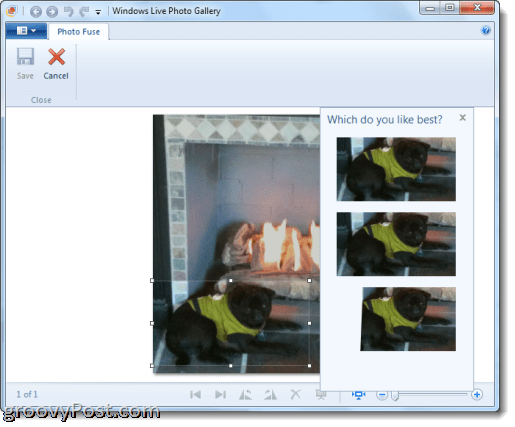
There’s even more fun with combining photos to be had in Windows Live Photo Gallery 2011, and this one is the newest and grooviest. PhotoFuse lets you take multiple photos with the same background and create a composite of the best shots. In the real world, you’ll probably use it to get perfect family portraits where no one is blinking or picking their nose. But in my world, I’ve enjoyed putting it to other good uses, such as removing obstacles standing in the way of my subject or creating an army of clones in a single picture. I remember back in the day when they’d have Photoshopping contests where you’d have to add, change or remove elements from a picture—now, you can do it with just a few clicks and zero technical know-how with Photo Fuse.
- Take several photos from the same vantage point and import them into Windows Live Photo Gallery 2011. This is important—you won’t get good results from Photo Fuse if you move your feet or change the angle or height of your shot. Tripods, people! Remember, no more than 10 photos can be used per photofuse.
- Select the photos you’d like to include in your Photo Fuse. You know the drill.
- Click Photo Fuse.
- Draw a rectangle around the face of the person you’d like to edit. This will bring up a list of alternate shots. Choose the one that looks best.
- Repeat Step 4 as necessary. You can even swap out the entire person to get a different pose altogether.
- Click Save when you’re done.
Because Photo Fuse is a bit hard to explain in words, and because I love playing with Camtasia, I made a short video that shows off the capabilities of Photo Fuse. Check it out:
One last thing: you’ll notice that there’s a More Tools button. From here, you can download even more extras for Windows Live Photo Gallery 2011, such as PhotoSynth, AutoCollage and Image Composite Editor (a more advanced version of Panorama). Microsoft is bound to add more down the road, and we’ll be sure to cover some of the best of the bunch in a later post.
Stay tuned, because, in the next post in this series, we’ll be covering some of Windows Live Photo Gallery 2011’s editing features. Comment Name * Email *
Δ Save my name and email and send me emails as new comments are made to this post.


![]()
