The first method is automatic but inflexible. The others require that you scroll through and make changes manually. But there’s also a compromise: you can use Find and Replace.
No, It’s Not Just for Finding Words
You may know to use Find and Replace when needing to change multiple instances of any text, but the tool’s superpower translates to formatting, too. Change the look of all text that has been formatted a certain way, or change the text itself. You can even combine options and get super specific, sophisticated results. This way, you can keep any unique changes you’ve made throughout, such as only having certain paragraphs double-spaced, while still applying changes automatically everywhere you need them. To get started, just open up the Find and Replace window, click More to expand the menu, and then click the Format button to view the list of available criteria.
You’ll find you can search for any formatting that appears in your document: fonts, paragraph layouts like indentation and alignment, or even the way text wraps around images. Click the Style option, for example, and you can change headings, bullet points, and more. Or choose Highlight to find all the highlighted text. Let’s illustrate the format-altering capabilities of Find and Replace with a straightforward example: changing some fonts.
Finding and Replacing Fonts in Word
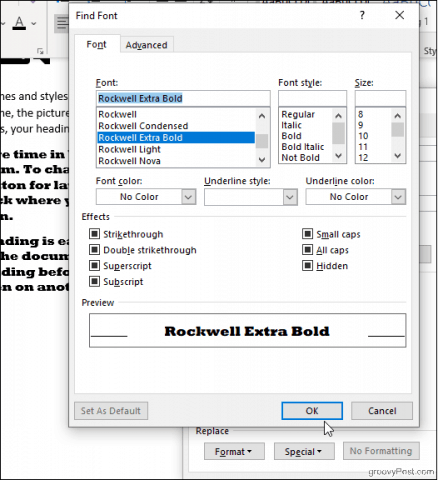
You’ll first need to search for the font you want to change. To do this, click Format > Font to bring up the Find Font window.
You can choose the specific font, color, size, and style you’re looking for, and once you click OK, your format selections will appear under the Find what field (the image below shows that we want to find everything displayed in Rockwell Extra Bold). To search for formatting only, don’t type anything inside the search fields; leave them blank. Otherwise, you can add some text if you’re also looking for specific content.
Repeat the process to choose a replacement font if desired. And if you change your mind, just make sure your cursor is positioned in the relevant search field (Find what if you’re changing your search criteria or Replace with if you’re changing the replacement font) and modify your choices as before. Click No Formatting to start over. In the example below, Word changed all of our document’s big, bold Rockwell font to Arial.
Most of the other options—Paragraph, Frame, Style—work much the same way, and since you can combine them, you can get pretty creative. An interesting trick is to search for words and specify only a font in the Replace with field. This will modify the font of the text you’ve searched for without changing what it says. Let’s say, for instance, that you’ve decided a certain company name should be displayed in bold red font throughout your document: enter the company name in the Find what field and choose the Bold font style and red font color for the Replace with field. This works the opposite way too: search by a font and replace everything displayed in that font with different words. Now let’s give this a try in Excel.
Finding and Replacing Formatting in Excel
Excel has some similar settings. Click Options within the Find and Replace window. Then, click Format to specify what you’re looking for (and what you want to replace it with, if applicable). Try clicking Choose Format from Cell to choose an example cell from your spreadsheet rather than fiddle with colors and alignments in the Find Format window.
Once you’ve chosen, Excel will populate a preview cell with your selections, and you’re ready to go. Find cells formatted as Currency, for example, and switch them all to the Accounting format. Find merged cells, or cells with specific border styles and fill colors. You can even search for locked or hidden cells. Then it’s easy to replace these with whatever new formatting you choose in the Replace with field.
Use Find and Replace for Customization and Convenience
With so many formatting options readily available on the Ribbon, Find and Replace is a seldom-used, though powerful, alternative. The advantage of this method over using the Design tab’s format settings is the flexibility to choose specific elements and change only those, rather than impose a new style over all of the document’s text indiscriminately. And it’s certainly more convenient than selecting chunks of text or sections of a spreadsheet with your cursor. Find and Replace can come in handy, so don’t forget it’s there!
![]()


